

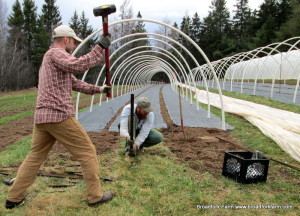
Last Sunday, we hosted a hands-on workshop called Extending Your Season with Caterpillar Tunnels, presented by ACORN’s Grow a Farmer program as part of their Learning Series. The timing was great as we’re in the midst of putting up 5 caterpillar tunnels (3 for vegetable crops, 1 for cut flowers, and 1 for vegetable seed crops).
If you look back on this blog (here), you will see that we wrote about putting up the caterpillar tunnels a few years ago. There have been a few changes since then that we will highlight in this blog post.
I really want to thank the participants of this workshop for coming up and being interested in this subject and working their butts off to help us put up these tunnels. I like to think of our farm as a quilt and all the participants definintely created their own patch that will live on and be rememebered with gratitude. We were also fueled with some very generous (and delicious) food donations from the wonderful Sequoia Natural Foods in Moncton (who we supply produce to during the growing season) and Just Us Coffee in Wolfville.
The picture above is basically what the area looked like when participants arrived.
The pictures below show one change we’ve made, and that is to use landscape fabric for the tunnels that will be in the same spot for the whole season or longer. This is due to the fact that it is very challenging to try to weed and/or mow the spaces in between the bows. With 2 of the tunnels, we laid landscape fabric over almost the whole thing leaving just strips where we’ll be planting tomatoes. You can see the fabric staples being put down along the edges to keep them in place.

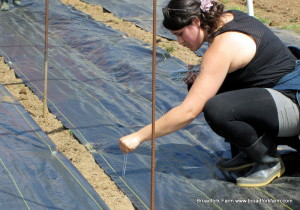
Previously, we used wooden stakes under each bow which were much cheaper (they were free) than the rebar we’re now using. This is a result of the change we’ve made in gound anchors. Hopefully, overall it will make things easier but there definitely was a lot more stake pounding initially. You can see in the first picture we were making small cuts in the fabric to put the rebar through.


We’ve been using PVC pipes as the arches which we’re still happy with overall. They are extremely easy to bend (we just bend them right over the stakes) and they have a bit more flexibility (than metal hoops) with snow loads in the winter.


So, here you can see the new anchors we’re using.
Our previous ground anchors were Duckbill anchors which snapped too often for our liking. Even though they’re strong enough, I don’t think they are good for the amount of water that can come off a tunnel and the galvanized steel would rust and break. So, now we’re using galvanized steel plates (2”x 4” with two holes drilled in them at each end) that slide over the rebar, and have a stainless steel snap clip to attach the rope to.


We use t-posts at each end of the tunnels to hold the “ponytail” of plastic covering at both ends. I like the 2 beards in the lower picture.


We had a great 7 year old helper named Marina who did an amazing job at running the rope around the whole tunnel.

And she was a real quick learner when Bryan showed her how to make the knots.


Another difference this year is that we’ll move and/or adjust our tunnels for winter use.
We like to keep them up over winter but the arches need to be spaced closer. In the past, we’ve just kept them at 4’ spacing all year and over winter. Now, we’re using 6’ spacing for summer (when we don’t need extra reinforcement) so more tunnels up over summer with the same materials.


Below is the updated list of where we sourced the materials for the tunnels and their cost.
The last 2 columns compare the cost per tunnel for arch spacing of 4’ or 6’.

Here is a link to download the .pdf of our material and suppliers list: Caterpillar Tunnels at Broadfork Farm handout


!")
We had our plates made at a local machine shop for around $1/each. Take the design, have them copy it, save a few bucks and support a local business. Win win!
Thanks Greg! That’s great advice.
The caterpillar tunnels handout pdf did not load up?
Sorry about that. I just fixed it.
Thanks so much for posting this information. If I was closer to you I would have helped out for sure. Out plan is to install some caterpillar tunnels this fall so we are ready for spring 2015.
There seems to be a problem with the links on with this post as they redirect back to the blog post itselft.
Thanks
Eric
Great to hear from you Eric! I checked out your website and really enjoyed it! Ok, so I just fixed the pdf link. It should work now but let me know if it doesn’t.
Hi, I keep referring to this post, great stuff! We’re down by Yarmouth. Where did you get your landscaping fabric and what was the cost? I don’t see it in your price breakdown. Thanks!
Hey Jennifer,
We got the landscape fabric from Dubois in Quebec. Here is the link to it: http://www.duboisag.com/en/greenhouse-nursery-ground-cloth.html
Thanks for enjoying the blog! If you ever come by this way, please stop in.
Shannon
Excellent! Got ours from DuBois a couple of weeks ago! We’d love to drop by sometime, this is our first year (late start) doing a market trial on a very small scale. 🙂
Hey,
We’re thinking of using these for winter production this year. We’ve used them during the summer with no issues (they’re great), but I’m a little concerned about wind and ventilation during the winter. We do a second layer of protection over our winter crops (19 gram Agribon fabric), but normally we’d be venting a winter greenhouse with roll-up sides that open midway up the sides of the greenhouse, leaving the bottom few feet of the sidewalls intact to protect the plants from harsh winter wind at ground level. Have you had any problems with rolling up the sides of the caterpillar houses and the desiccating effects of winter wind? We’re not in a super harsh winter climate (Asheville, NC), but we do get some snow and a good number of days with temperatures in the teens at night. Thanks!
I love the addition of snap clips. I might try that on one of our tunnels next year.
Hope all is going well with you guys, Dan