

On our farm, projects start with internet research and often use odd pieces of “junk” we’ve got hanging around.
One winter’s projects was a germination chamber.
Some of our seeds require light to germinate but most vegetable seeds don’t. They do need consistent moisture though.
Many growers use a germination (or sweat) chamber to reduce:
- space that seedling trays take up before the baby plants emerge (when they all need light)
- frequency of watering (which also relates to algae growth)
Since we moved to this farm, we’ve started our transplants many different ways. In the 1st few years, we made some kind of germination chamber that always looked a bit different. In our 1st year, we stacked bread trays by our wood stove and wrapped the stack with plastic to keep humidity in.
Once seedlings emerged, over the years, we’ve moved them to hot beds, our sun porch, and now to electrically heated benches in tunnels.
A germination chamber is an enclosed area, where the temperature and humidity can be regulated. There is often some sort of tray stacking system where it is easy to see which trays have germinated and be able to easily insert and remove trays.
Some people have used old chest freezers, but as our only free chest freezer was a little too small for our purposes, we used an old wire rack and former project leftovers. Farm Hack was a good online resource for helping us design our germination chamber.
It all started like this:
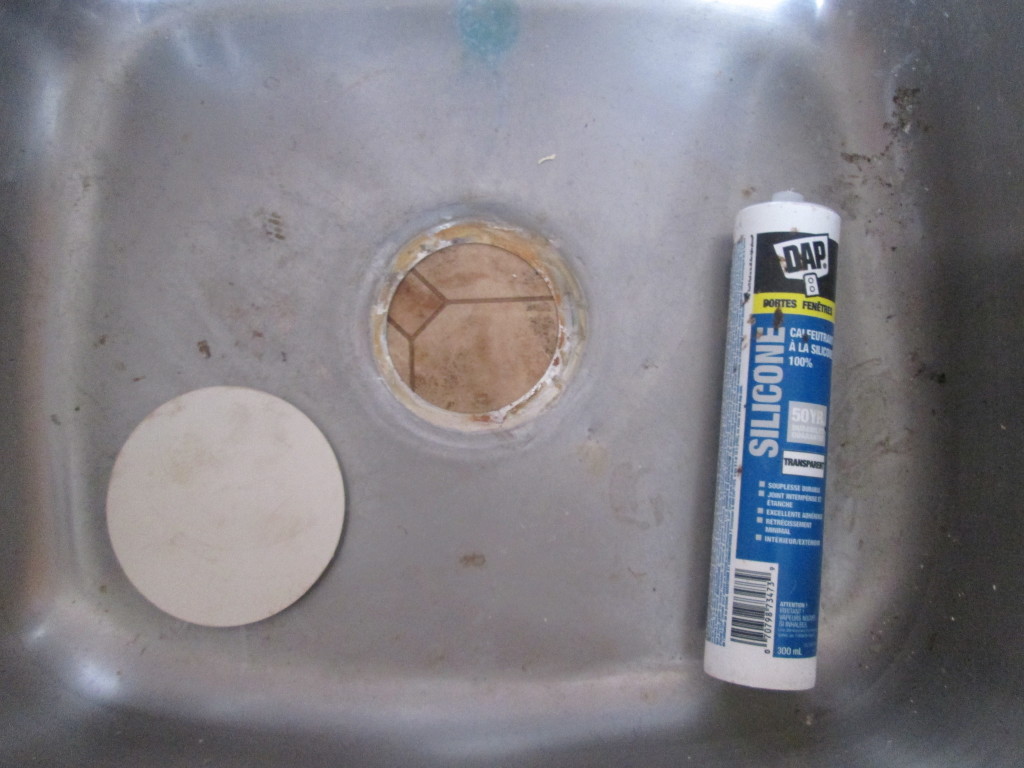
A 3 foot wide by 5 foot tall wire rack (sans shelves) and a stainless steel sink.

Ideally I would have taken this to someone to weld a piece into the bottom of the sink to seal it up (might still do at some point), but opted for the cheaper option of silicone and a sink stopper.
Fortunately, the spacing of the supports for the shelves worked with most of the trays that we use (the 50 cell Winstrips are our tallest trays).

For the shelving I used ½” EMT, (galvanized electrical conduit), and then made a little notch with an angle grinder at both ends to fit over the wire supports. We can easily remove them so the shelf spacing can be bigger for the Winstrip 50 cell trays, or to add more than 3 bars per shelf (4 is better for the flimsier trays).

I decided to recess the sink and slope the sides because of comments other builders had made about water pooling on the bottom.

Copious tuck tape to ensure the water finds its way back to the sink and not through to the floor.

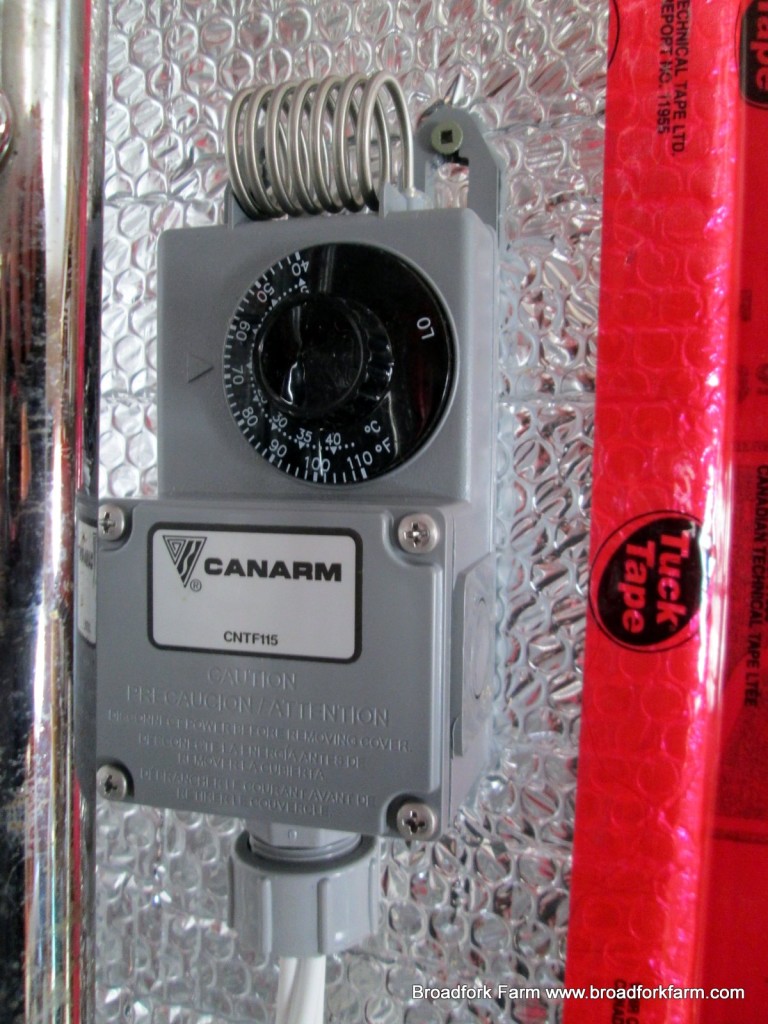
Originally, I was planning on using the Durostat prewired thermostat, purchased online from Farmtek/Growers Supply, but procrastinated a little and needed one faster than what ordering one online would bring. Luckily enough, our nearby plumbing and electrical supply place, Eddy Group, carried this dandy cooling/heating thermostat that mostly gets used for chicken barn applications. It ended up being about $20 cheaper (plus no shipping costs), and pretty simple to wire up.
So here is the beast.
Germination chambers are also called sweat boxes…for good reason. It’s quite moist in there, and there’s a lot of dripping.
My design wasn’t perfect. The water droplets on the door leaked out and onto the floor. A quick improvement was to use some tuck tape to create a little baffle so the drips go further into the box where they run into the sink.
We tried covering the water pan with metal sheeting to see if it would limit the sweating effect while still radiating heat into the box, but removed it because it seemed it would use more power to heat the box.

Although we don’t add water to the pan too often, a water line and float valve would be good. You don’t want to forget to refill it.
It’s not professional-looking but it works pretty well, saves space, and removes worry over trays drying out pre-germ.
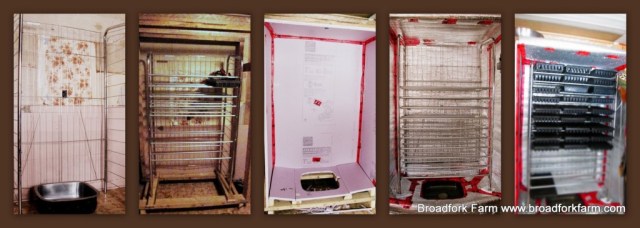
Here’s a re-cap in pictures of how we built it:


!")
Thanks for posting! Will you guys be monitoring humidity levels in the chamber? I’ve wanted to build one but worries about controlling humidity/damping off while still maintaining a warm enough environment with the bottom water heat design, and whether or not to add supplemental light have kept me from committing.
Hi Jeff, Thanks for your question and comments! We have not been monitoring humidity levels thus far. From the amount of moisture on the walls of the chamber I suspect it would be approaching 100%. We don’t really worry about watering the trays going in because of this, as long as the seeding mix isn’t bone dry. We also take the trays out as soon as we see any sign of emergence. I think there would be a lot of issues with damping off if trays were to stay in there with supplementary lighting. Because we don’t have a heated greenhouse and our heated benches don’t maintain optimal germination temperatures, we opted to go with the germ chamber to give our seeds a quick start.
Thank you so much for sharing this information! I’m starting a farm in Michigan and have been looking for good DIY germ chamber designs. This was very helpful! 🙂
Hey guys,
we love your design. We’re wondering if you could give us an idea about the wiring and perhaps what sort of power draw this has. Do you have a photo of how you connected the thermostat with the element?
We don’t have a ton of juice in our greenhouse, so we’re a bit concerned with how much electricity that little heater would need.
thanks for the help!
Best,
Samuel
To connect the heating element to the thermostat I used standard 14/2 wire (what is commonly used for wiring in houses). The element is 1500w, which is what most small space heaters are, so if it is the only thing you are running on that breaker, 15 amps should be adequate without any issues.
Hi! I based on your design to do something similar but smaller (1 plastic container only)
My seeds germinated great, however one day, all of them died. Super fast. all the little plants just went down.
Do you know what could’ve been wrong? was it temp? a lot of moisture? lack of air?
Sorry to hear your seedlings died! Was your plastic container clear or dark? If it was clear (and in the sun), it could have overheated. If it was dark, did you remove the seedlings as soon as they popped up out if the soil? Once they’re up, they need sunlight right away or else they’ll get “leggy” and reach up to look for sunlight. Hope this helps, Shannon
Hi Shannon
Thanks for your reply.
It is a plastic container, transparent, not directly in the sun (only gets sunlight after noon, until 5 pm)
I put a growing light outside on top of it that turns on by nights.
I put a small electric water heater inside, turning on every 3 hours for half an hour.
The bottom of the plastic container has water enough to completely cover the water heater.
I made a metallic inox structure inside to hold 2 trays of seeds.
I had the lid closed, just briefly opened it for a few minutes every day.
Like I said in my previous msg, what most intrigues me is that all of them (even different species) died at the same time — and now that I remember, specifically the only 4 peppers I planted did not grow at all, they just remained as seeds; the rest (tomatoes and some other herbs) did germinate.
Hey Broadfork,
Nice job on the chamber. I built a similar one a couple of years ago except it is much bigger. Fits between 90 trays, 100 trays if I push it. I also am using a heating element submerged in stainless steel restaurant pan. The heat element is always submerged. I use a float valve to regulate the level. I am using the Duro Stat from Farmtek. I want to know if you have experienced any issue with wiring. My Thermostat burned out last week and I am not sure why. I recently changed the cord that is connected to the heat element and plugs into the thermostat, so that is my first suspicion, but the rating of cord seems appropriate. I am also not well versed in electric matters and it seems as though from my internet searches, using the heat element this way is not common. I am using an extension cord that I have cut off the female end and have wired to the heat element. The hot and neutral are connected properly and I have a ground connected as well. The cord then plugs into the thermostat. My business partner is the one who originally wired this two years ago and has since left and is not available. So now I am trouble shooting on my own. How do you have your heat element wired? What type of wires/cord are you using?
Thanks Rocksteady,
Everything is using 14/2 wire (common household grade used for most circuits that don’t draw a lot of power), which is heavy enough for a 1500W heating element. I would make sure the extension cord you’re using is at least 14 gauge, and that your heating element is 1500W. If it is more than that, you should have a heavier gauge wire, and probably a 20 amp circuit. I don’t think the duro stat thermometers would be rated for much over 1500W. Hope that is a help.
Good luck, Happy Farming,
Bryan and Shannon
Hi we’re using Winstrips (and paperpots) in our germ chamber too.
**Wondering what you’re using to label your flats?
To keep track of what it is, date planted, hardening off info, where it’s eventually headed in the garden, etc, we’ve done wooden plant labels (but they bleed and get knocked out all the time by the shelves above them when we’re shuffling them around in the chamber) standard beige masking tape (it sticks…too well. it’s hard to get off the winstrips). Hoping to avoid anything plastic/disposable. Thanks for any thoughts on this.
Hey Ben,
We mostly use old blinds headed to landfill (need to make sure they’re not venetian blinds that contain lead) that we cut into short pieces. They don’t stick out too high above the tray. We have also used masking tape and it’s the same for us – not easy to remove. The blinds are disposable but we really use them – first one side then the other. One window-sized blind can make quite a few plant tags.
Thanks for your post. I just re-built our germinator and did some electrical upgrades from what the original Farm Hack post described. Here is a link to some photos. https://imgur.com/a/IhPzoGe
Tried to post on Farmhack also, but that site seems to be non-functioning.
Awesome – thanks so much for sharing!
I use an old crock pot for heat & humidity source.
Pingback: Starting Plants from Seed - Urban Homsteading PDX